It's obvious that I've been a little M.I.A. for a while. Life is getting so full of fun and craziness prepping for life with another baby that I have had to put work and blogging on the back burner. It's safe to say I probably won't have anything new or fun to share with you as often as I would like.
The nursery is turning out fantastic and little man's room has transformed into a BIG man room and we are all thrilled about it Other than getting ready for baby and surviving my last trimester and first few months (or years) as a mom of two, I don't/won't/choose not to have time for much else. My etsy shop has been closed for a while now, and I don't have any plans in the foreseeable future of reopening the store. I do love taking custom orders on the side (as I can handle them) and will of course always pursue a life full of love for all things art and design.
At this time, I feel my priorities are majorly shifting as our family expands, and I want to soak up all the time I can with my babies at home, and spend more time devoting myself to my husband and my Lord. For this reason, I am posting a notice to you all that I'm officially "closing the doors" as an etsy seller and blogger, in an effort to focus more attention on the wonderful life that is all around me.
This decision has weighed on my heart and is something I have thought through and prayed about for weeks. It has become a heavy load to keep up with the business end of blogging, producing, etc. and I have begun to stretch myself thin. I hope you will all understand that it is important for me to take a step back and concentrate on the precious gifts of fleeting moments with littles at home, devote more energy to supporting and loving my husband, and building a stronger bond with Christ my Lord.
I must also mention that this will only be temporary. As our children grow older and I am able to spend more time and energy on my business as an artist and instructor, I am sure that I will be making more appearances, hopefully to share some fun lessons/tutorials for you all.
Thank you all for the love, support, and encouragement throughout this adventure! I look forward to sharing more with you in the future. In the meantime, please keep our family in your prayers, and always know how grateful I am to have shared this experience with you!

Sunday, May 4

Monday, March 24
I'm blue, da ba dee, da ba die
I've got little art lesson for you today that I loved teaching to my middle & high school students. A PORTRAIT! And probably the easiest one ever. Let's dive in, shall we?
Here's a word for you - monochromatic. It means one (mono) color (chroma), so anytime you're going with this color scheme, you just use all different shades of a single color. The main goal for this lesson was to teach my kids about value, which describes the lightness and darkness of a color. We made really fun Warhol-esque self-portraits based on photographs the kids took of each other in class. Today I'm going to show you how to create this for yourself! You can go with a single color for the entire thing, or for most of it, adding in some contrasting colors just for fun (like I did).
Here's a word for you - monochromatic. It means one (mono) color (chroma), so anytime you're going with this color scheme, you just use all different shades of a single color. The main goal for this lesson was to teach my kids about value, which describes the lightness and darkness of a color. We made really fun Warhol-esque self-portraits based on photographs the kids took of each other in class. Today I'm going to show you how to create this for yourself! You can go with a single color for the entire thing, or for most of it, adding in some contrasting colors just for fun (like I did).
The following are some screen shots of the photo editing process that I completed with PicMonkey. It's a completely free photo editing website, though you can pay a little extra each month (I think $4?) to get some "Royale" features - which I do, because I use it all the time. You can do the same thing in Photoshop or just about any other photo editing software.
Start with a photograph (preferably digital -- if it's a print, you can always scan and import it into your computer to manipulate). Here's the photo I started with:

 The next step is to edit the photo with the Posterize tool. This breaks down the photo into flat "layers" of color. You can adjust how many layers, how detailed you want everything, etc. So play around with that for a little bit until you're happy with your image.
 I wound up with 17 "layers" or "Number of colors" as labeled by the program, with 48% "Detail".
 Next, I used the Black and White tool to simply make my photograph b/w and less chaotic for my own sake when transferring the image.
 Once totally happy with my image, all that was left was save and print!


 After a long night, I completed all of the face and crashed in bed. The next day I would finish.
I hesitated a little before painting the frames of his glasses just another shade of blue. I kind of wanted a fun pop of color, and with further review (i.e. hubby's input), decided the frames needed to be a different, bold color. So I went with oranges/reds for the shades. See what I did there?


First, I cropped my photograph into a square, because my canvas is a large square. Though this step is not essential, it gave me a better visual of how my final product would turn out.
I printed my image to be about 4x4 inches, because the viewfinder on my projector is small. This really doesn't make a difference in the final size. Once it was on paper, I stuck it under my projector in a dark room, lined it up how I wanted on my primed canvas, and started tracing. I opted to throw the image off to the side a little bit for some asymmetry.
Keep in mind that the number of colors you have will have an impact on how detailed your final image is, because more layers = lower contrast between each layer. In other words, some areas may be a little tricky to transfer if you have a lot of colors to work with. Even though the program told me I had 17 colors, I actually only used 8, because I decided not to transfer the background, and simplified a few areas on my own.
Here's the important part: when you are tracing the image, you have to remember to outline each of the little shapes or "layers" of color, in order to break it up into values for painting.
Once it's been traced, double check by putting your canvas next to your image and make sure you got every little shape. (Some free handing may be required.) Yes, it will look weird.
The next thing you'll do is basically create a giant paint-by-number for yourself. I assigned each shade a different number - 1 = lightest, then going from there. Label every shape with its corresponding number, depending on the shade it's supposed to be based on the photograph. Then, when you paint, you'll know your total number of values/shades to mix (I had 8) AND you'll know just where to put them. Always keep the photograph close by while you're working, for reference.
I wanted my main color to be blue. With 8 shades to create, I actually used black for the darkest (number 8) and white for the lightest (number 1), so I had 6 shades of blue to play with for the in-between.
All you have to do now is mix up paint and start putting your colors where they belong! This is really easy, just time consuming! The hardest thing about this step is trying to look past what you want the person to like to just painting shapes. It really is best to just focus on the painting piece by piece, and it turns out better in the end. Here's some photos of my work, after each "layer" or color was added. You can really see it start to come together as the photos progress! Please forgive the horrible photo quality. I was painting late at night, and the best way to photograph was with my flash on!
I hesitated a little before painting the frames of his glasses just another shade of blue. I kind of wanted a fun pop of color, and with further review (i.e. hubby's input), decided the frames needed to be a different, bold color. So I went with oranges/reds for the shades. See what I did there?
When it came to the background, I originally planned to paint this another color, so I tried lime green. I snapped these photos with my iPhone as I tried out some different options.
Lime green: not loving it. It broke the image up too much and the face just looked weird all piecy on top of a solid background that didn't quite look right. You may like it, but I wasn't crazy about it.
So I went with one of the blues from my palette.
Not enough contrast - it was all bleeding together.
I needed something in the same color family, but a color that would still offer contrast without being too stark. So I went with a deep bluish aqua, and it was perfect. After that, I did some touching up, and voila! It was done.
Right now it's hanging in the playroom (and looks smaller in this image than it does in real life - the canvas is 36"x36"). Eventually I'll paint a portrait of littlest man and put it on the same wall.
What do you think?! Would you be brave enough to try this for yourself? Feel free to ask any questions about the process in the comments section below. And if you try it for yourself, send me pics!!
Thanks for stopping by today!
Friday, March 21
if you like it then you shoulda put a frame on it
Guys. The frames in the kids' bathrooms look UH-ma-zing. The best part? The whole project cost about $30 and an hour to complete. I won't go into detail on how we completed this task, because there are tutorials galore all over Pinterest and I'm sure you've seen this done before. I just wanted to give you a shot at how it changed things for us in our two hall bathrooms!


Thoughts:
We used 3 1/2" pre-primed trim pieces from Lowes and some liquid nails to do the deed. I bought 6 pieces of 8' trim to complete TWO mirrors. I was able to get both side pieces (42") for each mirror from one trim piece. The other four pieces were for the tops and bottoms of each of these mirrors (one measured 58" wide, and the other 65" wide).
The tricky thing about our mirrors is they did NOT extend to the full width of the wall, unlike the vanity beneath it (see photo below). So I bought some 1/4" thick scrap/trim (the thickness of the mirrors), and cut them to fit in the gaps between the mirror and the wall (about a three inch space). You can see the pieces laying on the counter in the photo. I attached them to the wall with some screws and liquid nails. This way, the frames had a solid surface to adhere to outside the edge of the mirror, without wobbling, because I wanted the frames to extend the full width of the wall and make the mirrors look that big. My trim was wide enough that it could touch the edge of the wall and still have a good overlap on the mirror. Hopefully if you're doing this project you don't have to deal with this. If you do, just leave any questions in the comments section below.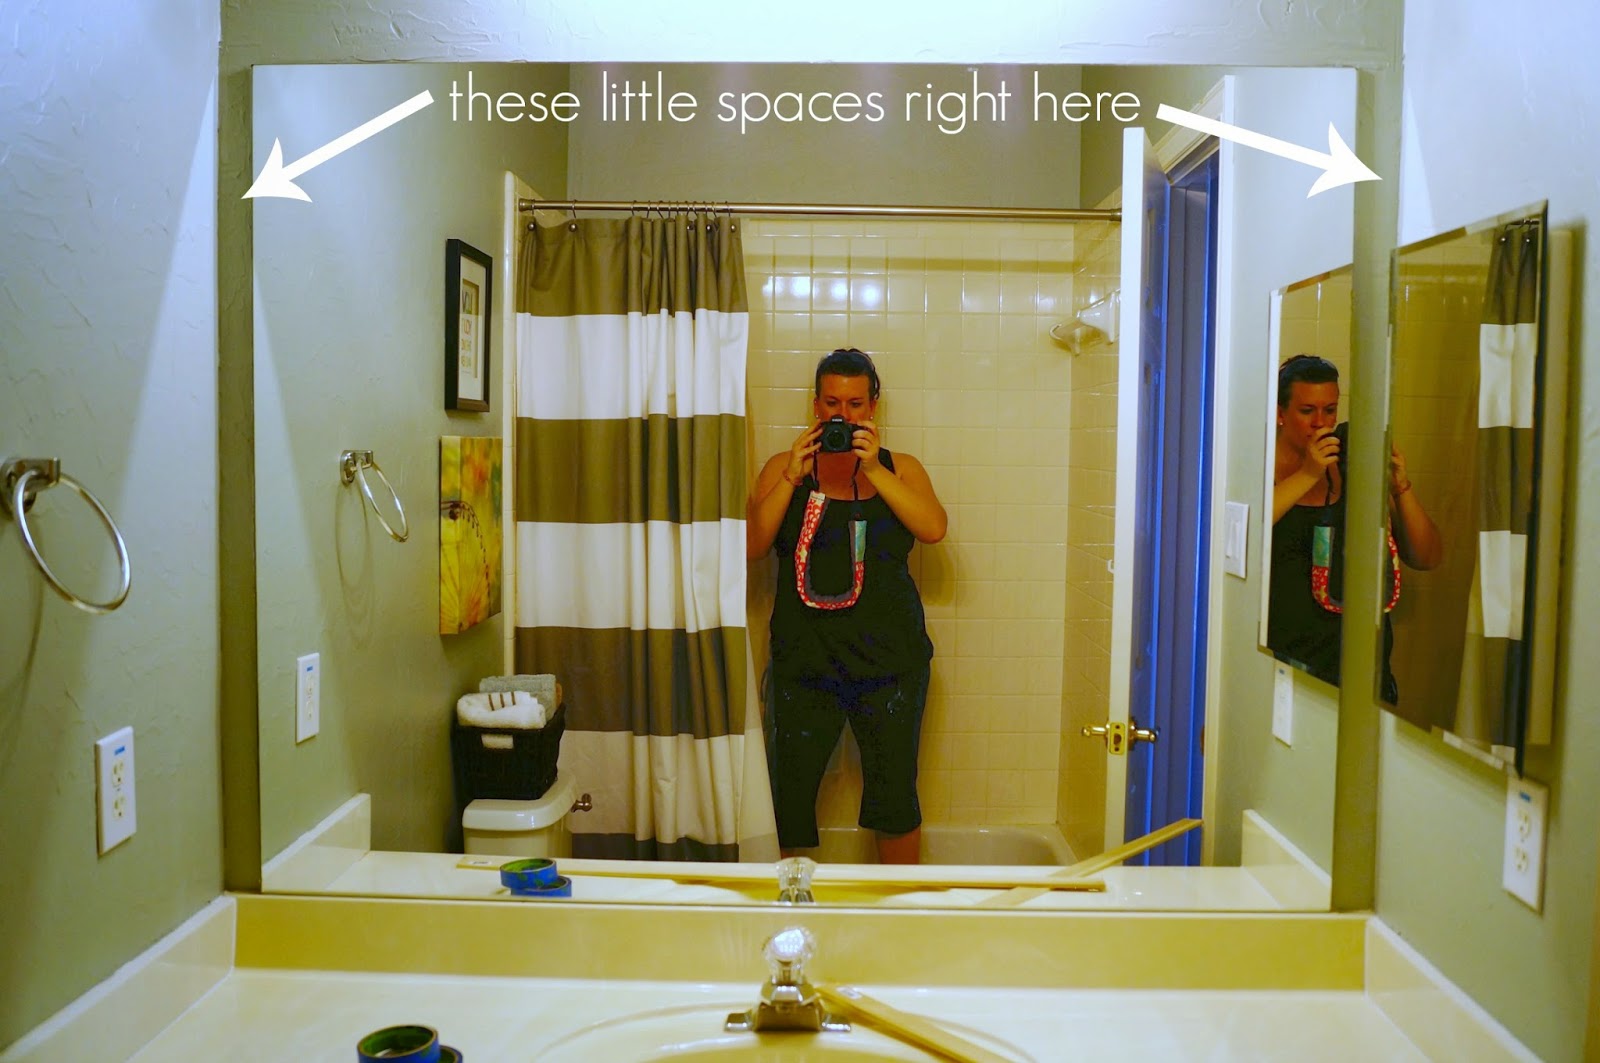
Supplies needed:
pre-primed trim in desired width, pattern
paint
miter saw
level
liquid nails
caulk
caulk gun
blue painter's tape
an extra set of hands
possibly some spacing trim (I'll explain)
possibly some spacing trim (I'll explain)
Thoughts:
We used 3 1/2" pre-primed trim pieces from Lowes and some liquid nails to do the deed. I bought 6 pieces of 8' trim to complete TWO mirrors. I was able to get both side pieces (42") for each mirror from one trim piece. The other four pieces were for the tops and bottoms of each of these mirrors (one measured 58" wide, and the other 65" wide).
The tricky thing about our mirrors is they did NOT extend to the full width of the wall, unlike the vanity beneath it (see photo below). So I bought some 1/4" thick scrap/trim (the thickness of the mirrors), and cut them to fit in the gaps between the mirror and the wall (about a three inch space). You can see the pieces laying on the counter in the photo. I attached them to the wall with some screws and liquid nails. This way, the frames had a solid surface to adhere to outside the edge of the mirror, without wobbling, because I wanted the frames to extend the full width of the wall and make the mirrors look that big. My trim was wide enough that it could touch the edge of the wall and still have a good overlap on the mirror. Hopefully if you're doing this project you don't have to deal with this. If you do, just leave any questions in the comments section below.
I used some white paint I already had to paint the pieces before they were cut and applied to the mirror. We measured carefully, cut, and applied them with liquid nails, then held them in place with some painter's tape while the adhesive set up. Although the tube of liquid nails says it dries fairly quickly, I opted to leave the tape holding everything together for the rest of the afternoon and overnight, just to make sure everything was set.


Alsoooo... fortunately for us, the mirrors weren't being held up with any type of brackets whatsoever, they were just glued onto the wall. Therefore, I had a completely flat surface and didn't have to work around any extra hardware. Not everyone is this lucky. If you're among the unlucky ones, my advice would be to use a drimmel tool to carve out little notches in the back of your trim pieces where the brackets can sit nicely inside them and your trim can be flush against the mirror/wall. There are also tutorials for this online.
Now all that's left to do is caulk the seams and the inner edges where the trim meets the mirror, then touch up with paint. Easy peasy! I decided to wait until everything was completely dry and set up before applying the caulk.


This is a super simple, cheap, and easy upgrade that can add major bang for your buck to your home, and give your bathrooms a beautiful custom look. You don't even have to be a pro to do it. Now I'm itching to replace the fixtures in these rooms to update them even more! Just add that to the list...
Here's one more before & after for the road. Have an awesome weekend, and come back Monday for an art lesson you won't want to miss!
Tuesday, March 11
and the winner is...
It's a...


 Yay! We are beyond excited to have two little men running around this place! And now I am thrilled to show you what I did with this beautiful Tangerine paint!


In the words of Molly Shannon, "I love it, I love it, I love it!"
 It's on now, peeps!! All that's left is the decorating and furnishing part (the fun part). I am going to be making a few things out of the same material as the curtains, and a little teething guard out of this fun fabric by Riley Blake, called, "Boy". It's a navy, grey, orange and red polka dot.


The stripes are each 24" wide. I measured down from the top rather than up from the bottom, because the bottom of the wall is usually a little more disguised by furniture, and the top of the wall is not. Therefore, if I had a stripe that wound up not being "complete", which I did, it's no big deal. If you were to see a wall full of wide stripes and the top stripe was narrower, it would be a little awkward, because you would always see it (and naturally your eye is drawn up when there's a pattern like this on a wall). I also decided the top stripe would start the orange pattern, to separate the obviously not-white ceilings from the obviously white background.
Hubby helped me lay out the stripes with a laser level and painter's tape. We measured every 24" down from the ceiling and made a little mark with chalk first, then used those marks for where our lines would go. We shot the laser through the chalk mark, leveled it, and began to tape along the laser line. It was definitely a team effort!
When taped, it looks like the orange stripes are wider than the white, but they're not! The total painted area for the orange was to be 24", so the tape went outside those lines, and therefore the tape cut into the "white" areas. When the tape came off, they were all the same size!
Using a quality brand of painter's tape is obviously the most important part of a project like this, but even with the best tape, textured walls still give way to some "leakage". Therefore, before I painted them orange, I went over the inner edges of the tape (where the orange would go) with a brush and the same white paint that was already on the wall. You can see this clearly on the top tape line in the second photo! What this essential step did was seal up the edges of the tape to prevent the orange from bleeding through. The white leaked through first in the textured spots, then it dried the same color of the wall, and it created a seal against the edge of the tape for the orange. Make sense? Once the white was dry, the orange went on! It took two good coats to get solid coverage, about a quart and a half of paint. I used a paintbrush to get in the corners, and a roller for the rest.
For those of you who don't know what a teething guard is, it's a piece of fabric or plastic that you secure onto the top of the crib rails, so when your little one is teething, they don't gnaw the wood/finish off the crib. We figured this out just a little too late with baby #1, but this time we will be ready to go. I'll probably be doing all of the sewing sometime this week! Yay!
I'm starting to figure out and purchase some decor, which you'll see coming together in the next few weeks/months. The disassembled bed should be making its grand exit in the next few days, hopefully. Currently the floor is completely covered with baby clothes I sorted through today, and are soon to be washed and put away. Little decorative items are starting to stack up, and we will be furniture shopping soon.
Project nursery rundown:
paint grey wallspaint white focal wallsew and hang new curtainslay out design for focal wallpaint color(s) on focal wall once we find out the sex of baby "Mo"get rid of full bed- purchase crib, dresser
, and shelves - sew bedding and other accent items
- bring orange glider over from #1 little man's room
- accessorize shelves
- hang art/decor on wall
- update ceiling fan and doorknobs
- have a baby
Friday, February 28
they're up
This past Sunday & Monday I worked on the curtains for baby Mo's room and am SO pleased with the results. The room is starting to really take on a personality, and will even more so in the coming week when we find out some important details that will give our room its direction. We can't wait to show you what we do with this room! So many ideas on hold, I can hardly stand it!!

 I plan to also make the crib skirt and a cushion (for the playroom, to go with little man's) out of the same fabric, just like I did for him.
The panels are lined, which give it a more professional, finished look, and add just a little bit more shade when closed. This room gets pretty dark on its own, so instead of a blackout liner, I just went with a regular, light-weight liner.
I originally made a rod pocket across the top of the panels, but since the fabric + lining is pretty thick altogether, I wasn't crazy about the way they bunched up. So today we swing by Lowe's to grab some curtain clip rings, like we used in little man's room. I like the way you can pull the curtains open and closed so easily with them, and they help the panels hang a little more straight. I probably need to iron these bad boys again, and may raise the rod just a tad. Haven't decided if I'm crazy about the slight puddle on the bottom, but it will probably be ok. I'll have to walk by a few hundred more times before I make a final decision on that...
The window is really small, so I actually took the rod out 14" on each side of the window to give the illusion of a larger window. How many times can I say "window" in one sentence?
This slub fabric is perfect, and I love the energy the bold pattern brings into the room. It will compliment nicely with the rest of our decor. I know, I know, I'm really keeping you on your toes! Trust me, no one is more impatient right now than yours truly :/
 |
| ^ ^ like this ^ ^ |
Glad to check another item off my list! A few major items to go... and the next time you hear from me, we will be sharing some exciting news!

paint grey wallspaint white focal wallsew and hang new curtainslay out design for focal wall- paint color(s) on focal wall once we find out the sex of baby "Mo"
get rid of full bed- bring in new crib, dresser, and shelves
- make bedding (crib skirt & teething guard)
- bring orange glider in from little man's room
- accessorize shelves
- hang art on wall
- eventually update ceiling fan and doorknobs
- have a baby
Wednesday, February 26
five important tips for the DIY homeowner

After another successful project in the books this weekend, I was thinking to myself, "What advice would I give to my friends or family who are trying to do some of these same projects around their homes?" I'm not a "professional" in the sense that I don't get paid for what I do, but I have some training, a lot of creative inclinations/skills, and enough experience to know how to help people out with some common DIY endeavors. Most of the people I know come to me for advice on how to build/decorate/lay out things in their homes, so that makes me feel that I'm somewhat qualified to teach a little here and there. Not to toot my own horn or anything. So I came up with this list of five things that I would tell a first time DIY-er, or someone starting a new project they're not too sure about.
1. Know your limits
One of the smartest thing any DIY-ing homeowner can do for themselves is to know their strengths and their weaknesses. I know from my own experience what I can handle, and then I know there are things that are just completely beyond my skill level/expertise. I would never try to mess with plumping, electrical, structural home issues. I'll even throw in flooring and tiling. To me, those things really are best left to the professionals. KNOW what you can do, and what you can't. Hiring a professional doesn't mean you are giving in or accepting defeat, it means you are being smart - and probably saving yourself some money & stress in the long run.
2. Be realistic
Part of knowing your limits is being realistic with your time and your wallet. I can't tell you how hard I laugh when I watch some of the homeowner renovation shows on TV. You'll see a sweet little couple who is absolutely determined that they are going to gut and completely remodel their entire kitchen for $6,000 in a weekend. I'm sorry, but it ain't gonna happen. You could easily spend $6,000 on appliances alone! I'm no expert, but I've done enough research and work in my own home to know that setting these types of expectations for yourself is completely unrealistic, and hurt you in the long run. What usually winds up happening at the end of the show is their original budget & actual cost (and time) is compared, and what they actually spend is at least twice, if not more than they thought they would - AND nine times out of ten, they wind up calling in the pros to help them finish the job because they realize they are in over their heads. Do your research, and come up with a budget and time frame that will truly work for your family's schedule and finances.
3. Budget for about 25% more than you think you will spend
There are always, always, always last minute costs that tend to add up. Forgetting to budget in hardware, paint, and other things you didn't put on your list but grabbed while you were at your local home improvement store can majorly add to the cost of your project. You would probably be smart to add in a little extra materials in case of mistakes - because let's face it - it happens. Say you need a project that requires 10 feet of lumber. Buy 12 or 14, just to be safe. If you're doing a bigger renovation project that requires the help of professionals, expect the little things to add up. Sometimes you run across issues tearing a wall down that you won't actually see or know about until that wall comes apart! You need to be prepared for these types of things, and adding a little extra cushion in your budget is the best way to make these unanticipated costs a little easier to swallow.
4. Enlist in help
Most DIY projects are at least two-person jobs, some require more than that. It's nice to have an extra set of hands or eyes on a project, if for nothing more than to just hold something steady while you nail it into place. In addition, when bringing on another person, you're also bringing in a different skill level and view point that can help you because either a) they know how to do something that you don't, or b) they may bring something up that you hadn't thought of. You may also want to ask someone to come over - cue the grandparents! - just to keep your kids occupied so they aren't running underfoot while you're trying to concentrate. So don't be afraid to ask for help, whether it be from friends, family, or your local professionals.
5. Expect mistakes
Listen, mistakes happen, even to the best of us. We all know the motto, "measure twice, cut once", but even sometimes you may have read your notes or directions wrong, and/or it's 2 am and you are running on fumes. This is when mistakes happen. OR you could complete all or part of a project, and it's not turning out quite how you wanted/anticipated, and you either backpedal or start over. Screwing up is inevitable, but in an attempt to minimize catastrophes, the following can be helpful:
- Think things through. Do your research. There is no shame in taking your time and being very careful with your planning. Double and triple check things like measurements, just to be sure.
- Take short, frequent breaks. Make sure you've eaten and are keeping yourself hydrated. When you get weak from hunger, thirst, or being overheated, it's easy to get distracted and rush through something to just "get it done". Stand back and take a look at your work as it develops to make sure it's headed a direction that you're happy with. Know when to stop and say, "I need to finish this another time." Just don't wait too long :)
- Have extra materials on hand, in case you mess something up and need to redo it. If you don't use the extra stuff, save your receipt and return it!
- Stay calm, and know that messing up is just part of it, whether big or small. But hopefully following these five tips will keep things on the small scale!
Alright homeowners, what do you think? Do you have anything to add? Are you ready to tackle your next big project?!

Subscribe to:
Posts (Atom)