Showing posts with label nursery. Show all posts

Tuesday, March 11

and the winner is...

It's a...
Yay! We are beyond excited to have two little men running around this place! And now I am thrilled to show you what I did with this beautiful Tangerine paint!
The stripes are each 24" wide. I measured down from the top rather than up from the bottom, because the bottom of the wall is usually a little more disguised by furniture, and the top of the wall is not. Therefore, if I had a stripe that wound up not being "complete", which I did, it's no big deal. If you were to see a wall full of wide stripes and the top stripe was narrower, it would be a little awkward, because you would always see it (and naturally your eye is drawn up when there's a pattern like this on a wall). I also decided the top stripe would start the orange pattern, to separate the obviously not-white ceilings from the obviously white background.

Hubby helped me lay out the stripes with a laser level and painter's tape. We measured every 24" down from the ceiling and made a little mark with chalk first, then used those marks for where our lines would go. We shot the laser through the chalk mark, leveled it, and began to tape along the laser line. It was definitely a team effort! 

When taped, it looks like the orange stripes are wider than the white, but they're not! The total painted area for the orange was to be 24", so the tape went outside those lines, and therefore the tape cut into the "white" areas. When the tape came off, they were all the same size!

Using a quality brand of painter's tape is obviously the most important part of a project like this, but even with the best tape, textured walls still give way to some "leakage". Therefore, before I painted them orange, I went over the inner edges of the tape (where the orange would go) with a brush and the same white paint that was already on the wall. You can see this clearly on the top tape line in the second photo! What this essential step did was seal up the edges of the tape to prevent the orange from bleeding through. The white leaked through first in the textured spots, then it dried the same color of the wall, and it created a seal against the edge of the tape for the orange. Make sense? Once the white was dry, the orange went on! It took two good coats to get solid coverage, about a quart and a half of paint. I used a paintbrush to get in the corners, and a roller for the rest. 

In the words of Molly Shannon, "I love it, I love it, I love it!"
It's on now, peeps!! All that's left is the decorating and furnishing part (the fun part). I am going to be making a few things out of the same material as the curtains, and a little teething guard out of this fun fabric by Riley Blake, called, "Boy". It's a navy, grey, orange and red polka dot.
For those of you who don't know what a teething guard is, it's a piece of fabric or plastic that you secure onto the top of the crib rails, so when your little one is teething, they don't gnaw the wood/finish off the crib. We figured this out just a little too late with baby #1, but this time we will be ready to go. I'll probably be doing all of the sewing sometime this week! Yay!
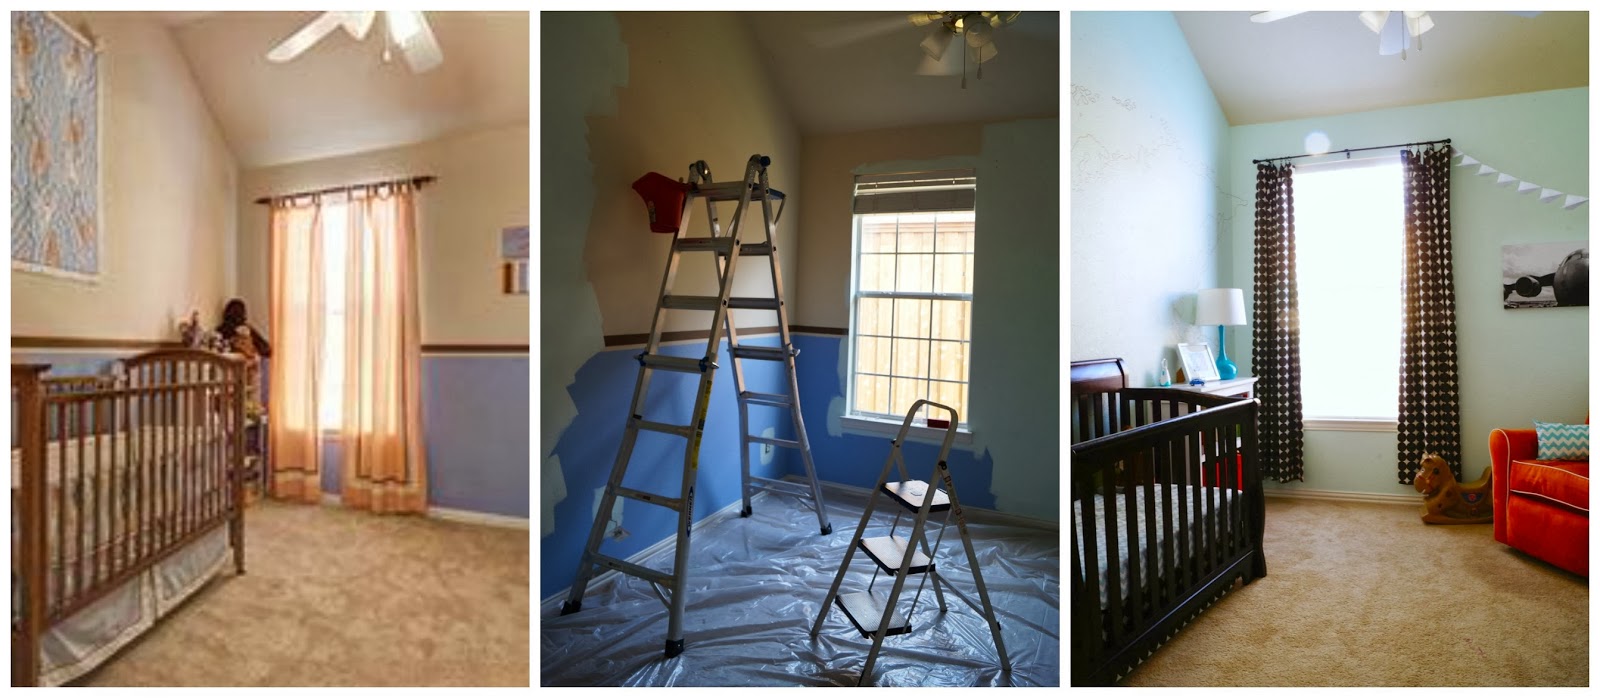
I'm starting to figure out and purchase some decor, which you'll see coming together in the next few weeks/months. The disassembled bed should be making its grand exit in the next few days, hopefully. Currently the floor is completely covered with baby clothes I sorted through today, and are soon to be washed and put away. Little decorative items are starting to stack up, and we will be furniture shopping soon. 

Project nursery rundown:
  • paint grey walls
  • paint white focal wall
  • sew and hang new curtains
  • lay out design for focal wall
  • paint color(s) on focal wall once we find out the sex of baby "Mo"
  • get rid of full bed
  • purchase crib, dresser, and shelves
  • sew bedding and other accent items
  • bring orange glider over from #1 little man's room
  • accessorize shelves
  • hang art/decor on wall
  • update ceiling fan and doorknobs
  • have a baby
Happy March, everyone! We're so happy to share our news and progress with you!

Friday, February 28

they're up

This past Sunday & Monday I worked on the curtains for baby Mo's room and am SO pleased with the results. The room is starting to really take on a personality, and will even more so in the coming week when we find out some important details that will give our room its direction. We can't wait to show you what we do with this room! So many ideas on hold, I can hardly stand it!!
The panels are lined, which give it a more professional, finished look, and add just a little bit more shade when closed. This room gets pretty dark on its own, so instead of a blackout liner, I just went with a regular, light-weight liner. 

I originally made a rod pocket across the top of the panels, but since the fabric + lining is pretty thick altogether, I wasn't crazy about the way they bunched up. So today we swing by Lowe's to grab some curtain clip rings, like we used in little man's room. I like the way you can pull the curtains open and closed so easily with them, and they help the panels hang a little more straight. I probably need to iron these bad boys again, and may raise the rod just a tad. Haven't decided if I'm crazy about the slight puddle on the bottom, but it will probably be ok. I'll have to walk by a few hundred more times before I make a final decision on that...

The window is really small, so I actually took the rod out 14" on each side of the window to give the illusion of a larger window. How many times can I say "window" in one sentence? 

This slub fabric is perfect, and I love the energy the bold pattern brings into the room. It will compliment nicely with the rest of our decor. I know, I know, I'm really keeping you on your toes! Trust me, no one is more impatient right now than yours truly :/
I plan to also make the crib skirt and a cushion (for the playroom, to go with little man's) out of the same fabric, just like I did for him.  
^ ^ like this ^ ^
Glad to check another item off my list! A few major items to go... and the next time you hear from me, we will be sharing some exciting news!
  • paint grey walls
  • paint white focal wall
  • sew and hang new curtains
  • lay out design for focal wall
  • paint color(s) on focal wall once we find out the sex of baby "Mo"
  • get rid of full bed
  • bring in new crib, dresser, and shelves
  • make bedding (crib skirt & teething guard)
  • bring orange glider in from little man's room
  • accessorize shelves
  • hang art on wall
  • eventually update ceiling fan and doorknobs
  • have a baby

Thursday, February 20

home tour update

Since the nursery is at a bit of a standstill for the next two weeks, I thought it would be fun to post an update on some of the rooms that we've worked on a bit since I last shared photos with you.

Master bedroom 
-since you last saw it: painted, floating shelf hung & filled, curtains & curtain rods hung, and I found the most FABULOUS painting at Garden Ridge for above the bed!! I'm in LOVE! This is such a great space with all the natural lighting, high vaulted ceilings, and extra square footage. We love to relax in here!
-still to do (tomorrow): build headboard
-eventually: find a couch or beautiful chair to put in front of the bay windows

Kids' bathrooms
I've never shown you the bathrooms, but one was tan and one was sage green when we moved in. There really wasn't much to see before, they were pretty plain. Both are now Behr's Southern Breeze, which is a favorite of ours. The bathrooms and laundry room in our first house were this color and we just had to bring it with us. Both bathrooms have the same shower curtain and color scheme, and coordinate well with the colors we've chosen for the rest of the house. It's so hard to get an accurate depiction of the color with the incandescent lighting, but trust me, it's the most beautiful, calming blue/green/grey you've ever seen.
bathroom #1 
In bathroom #2, I took the awkwardly hung towel bar off the wall above the toilet and replaced it with some pretty prints. Right now we don't use the bathroom much, but when it is regularly in use by a kiddo, we will probably put a towel bar on the back of the door.
bathroom #2
-still to do (in both bathrooms): replace linoleum flooring with wood-look ceramic tile, frame out mirrors, replace faucets and light fixtures

Little man's room
This is another room I never showed you, which is pretty much complete (for this stage in his life), except for updating the ceiling fan. The wall color is Neon Mint by Valspar. I'm not much of a "themed bedroom" type person. I like to just pick a modern yet versatile color scheme, focus on that, and see what develops. That keeps me from being tied down to one look, and also keeps options open for changing things out as the kids grow. Our little man has really started to love airplanes, and I kept seeing the cutest airplane decor on Etsy and in random places, so we just kind of went with it. We tried not to go overboard. You may remember the world map mural from this post.
-still to do: replace ceiling fan and finally add more fabric to the bottom of the curtains (I incorrectly remembered the measurements I took when we came to see the house the first time, so I wound up about 6 inches short. I've been saying "I'm going to fix that" since we moved in.)

Entry hall
-since you last saw it: nothing has really changed here, but the last photos I posted of it were pretty crappy, so I thought I'd give it another shot. Changing the living room up has also had a major impact on what you see when you come through the front door.
-still do do: possibly hang another art piece or two somewhere
Note: our special headless cat
The light fixture in here will eventually be updated, hopefully with something a little larger and contemporary like this from west elm:

Living room
-since you last saw it: The only thing that's changed is our seasonal decor and a few lighting pieces. We had an additional eyeball light installed over our new built in shelves to bring some light to the corner and really showcase the contents of the shelves. The opposite corner of the room was pretty dark, so we got a cool floor lamp from Target and now it has the perfect amount of light to balance out the space.
-still to do: this year I'd like to retile the fireplace with something lighter, cleaner, and more modern - like these beautiful marble tile examples:
   
We'll see how hubby feels about that ;)

We had some recessed lighting and a fan installed in the media room, but we haven't yet built or had someone build an entertainment/shelving unit around the TV.

Our kitchen and dining room remain a bit unfinished, so I'll hold off until we make some more progress in there to show you what we've accomplished. 

Some overall/eventual (read: big & expensive) home updates we'd like to do is replace all the tile in the entry, kitchen, and dining room with dark wood flooring. Another rather expensive upgrade will be replacing all the brassy doorknobs & handles throughout the entire house. We are currently focusing some of our time and energy into the exterior of our home, to give it some more color & curb appeal. Oh yeah, and this little thing called Project Nursery. 

When you are creative, it seems like things are always changing in your home. I am still in shock when I look back at all the old photos we have of our house, compared to the look and feel of our home now. It has evolved so much, and continues to do so - seems like - every day! Hubby keeps telling me, "No more projects!!". Pssh. 

What is it like in your home? Are you always working on something like I am??

Thank you for coming over today to see what we've been up to! 

Wednesday, February 12

back on track

Last week we were fortunate enough to spend some time in sunny Florida while North Texas was hit with not one but two icy snow storms. We went to Tampa to attend my ten year reunion at Florida College and spent time with some friends I haven't seen since our college days together! It was a nice little getaway, but after a little bout with fever and a stomach virus (poor little man), we were definitely ready to be back home. Here's a few snapshots from our first family trip to the beach!

Since we've been back, I've been waiting for a nice sunny day to take a few more photos of our in-progress nursery. The white background for the focal wall is done and the room looks astonishingly different. I even got a comment from hubby, "This room really does look a lot better." I don't know when he's going to learn to trust me. Now we have to lay out the design on the wall to be painted once we find out what baby Mo will be, and I need to sew my curtains this week! So that's next on the agenda.
We pushed the full bed over into the corner so we could see more of the room at once and also give ourselves some space for bringing things in & taking things out. You may notice that I didn't finish the top edge of the white paint, and there's a reason for that. The design we're going to lay out will cover up the top edge of the wall, so I didn't see any point in edging it with a nice straight line when I was just going to paint over it eventually. You'll also see the nineties-tastic fan that both of our kids' rooms are sporting, and we hope to replace the fans sometime in the near future with something prettier and more modern, though it will still be a ceiling fan, because we live in TEXAS. Enough said. 
I'm LOVING the fabric I ordered from fabric.com for the curtains and some of the bedding and accent pieces. It's a larger chevron print and will go great with our color schemes, whether Mo is a he or a she. I've bought fabric from them several times before and their prices, selection, and quality can't be beat!
Right now it does look very plain, and that's ok. It won't stay that way for long. If it seems like we are making little progress, I suppose that's because you won't necessarily see all the little "behind the scenes" things I've been working on pretty much every day. The room is more organized - all the baby items stored away in random closets and spaces in the house have been brought into one central location (in the nursery, where they belong) and most non-baby items have been moved into more appropriate places. Bringing another human into our home is forcing me to really make sure things have their proper place since our move last May. I almost can't believe in a few short weeks we will be half-way through this deal with a name to put to this belly. Thanks to my second trimester energy, I'm really raring to go and am excitedly checking things off all my lists, big and small.

I'm sure we will be furniture shopping in the near future for things to fit in this new space, but we'll probably wait until we find out what Mo is before making any final decisions. We like really timeless pieces that have clean, contemporary lines, but I feel like even classic furniture can be swayed to look more male or female. So that's another thing we can start thinking about, but are waiting a bit before making any final decisions.


Project Nursery rundown:
  • paint grey walls
  • paint white focal wall
  • sew and hang new curtains - in progress
  • lay out design for focal wall
  • paint color(s) on focal wall once we find out the sex of baby "Mo"
  • get rid of full bed
  • bring in new crib, dresser, and shelves
  • make bedding for crib
  • bring orange glider in from little man's room
  • accessorize shelves
  • hang art on wall
  • eventually update ceiling fan and doorknobs
  • have a baby
Thanks for checking in on this little update! The next few weeks are going to bring much bigger, bolder things to this room! 

Tuesday, January 28

ocupado

This room is really coming alive and starting to look more like someone might live in it. Yesterday I finished all the grey, so today's naptime plan is to paint the white focal wall. The ladder shelf I ordered from Amazon also arrived, so we excitedly put it together and set it up in the new room while we ate lunch today.
Here's a little peek into the room, from the entry way:
While it still functions as an in-progress mess and catch-all room, we are slowly but surely moving things out to their proper places as each step of the project brings us closer to the finish line. I think the biggest difference will be seen once the full bed is out to its new owners, and the space opens up so we can bring in the new furniture.

I picked this sweet little guy up at Pier 1 yesterday. I guess this is officially the first item we've bought for baby #2!

Here's just a shot at where we were last week and where we are today:
Makes my heart happy!

Project Nursery rundown:
  • paint grey walls
  • paint white focal wall
  • sew and hang new curtains
  • lay out design for focal wall
  • paint color(s) on focal wall once we find out the sex of baby "Mo"
  • get rid of full bed
  • bring in new crib, dresser, and shelves
  • make bedding for crib
  • bring orange glider in from little man's room
  • accessorize shelves
  • hang art on wall
  • eventually update ceiling fan and doorknobs
  • have a baby


Saturday, January 25

and so it begins...

Well, I'm here to give you a little in-progress shot of what's been going on in the nursery this week. This room has been our extra bedroom/catch-all room since we moved in last summer, and we are finally getting into transforming the space. The biggest change that needed to happen first was PAINT, of course! Any old Trading Spaces fans out there? The best part of the show was the reveal of what was in the paint cans, because it gave you a sense of direction for the entire room. I recreated this scene with little man, who was just as impressed as I thought he would be. Just a little Genevieve moment, no big deal.

Like the rest of our house, this room was painted in flat blah-beige paint. The room had an orange and blue stripe running around the room about six feet up. We liked the stripes, but I wanted to do them differently. Plus the wall color had to go. 
Please excuse the mess and iPhone quality photos.


I knew the room would probably be a lighter color so I needed to prime over the stripes to ensure complete coverage. There's not many options out there that are safe for pregnancy. Lo and behold, Kilz actually makes a NON-VOC primer (which the lady at Lowe's didn't even realize existed), so my little preggie heart was happy knowing I wouldn't have to direct this task to someone else and could just knock it out myself.
This stuff seriously did the trick. I was only surprised because I've never really used primer before. I went over the stripes twice, just to make sure they were totally blocked out.
After priming the stripes, I went ahead with my favorite angle brush and did all the edging in the color I decided on - Granite Dust by Valspar (also the same color as the playroom, kitchen, and dining room). Valspar Signature is the best. paint. ever. I will use nothing else. It's thick, got great coverage, and is also ZERO-VOC! Safe to use for all you preggies out there! At this point I was already beginning to see the difference the new color would make and fell in love. The grey offered a better contrast to all the trim and was softer on the eyes than the obnoxious yellowish-beige.
Then yesterday I rolled out all the grey! It makes such a huge difference already. I didn't realize just how much the stripes really "shortened" the room. I mean, our ceilings are 12 feet high, and after wiping out the harsh horizontal line they created, suddenly the room seemed twice the size. The new paint is also satin finish, so it bounces the natural light around the room beautifully, opening up the space tremendously from the previous flat paint. Seriously, who uses flat paint?!
You can see a little preview of some of the fabric I plan to use for curtains and some of the bedding in here, whether this nugget is a boy or a girl. For a boy, we will bring in orange with the navy, and for a girl we will be doing coral & orange with a little navy for some contrast and weight. So we really are bringing the previous colors back, just in better form. The wall left unpainted will be given a base coat of white, which will eventually become the focal wall in the room.
The room continues to really change with each new step! The next part of the project will be hopping up on top of the ladder to go around the top two feet of the room, then edging and painting the white wall. I'm so excited to share little bits and pieces of this project with you as it develops!